


In this tutorial, we’ll use an example to show you how to use the check-in feature. For this example, we’ve chosen a children’s service with several age-appropriate groups that takes place every Sunday at the same time as the main service. One or more of our staff members stand in the foyer of our congregation and welcome the children. In our example, the staff members use the web interface for check-in rather than the app.
So, our requirements are as follows:
- The children’s service takes place every Sunday at 10:00 a.m., at the same time as the main service. The service dates are listed in a calendar.
- The four children’s ministry groups Toddler Bunnies, Lions, Caterpillars and Butterflies are all subgroups of the supergroup Children’s Church and cover all age groups.
- Children are already registered as participants in every children’s subgroup.
- Every staff member has access to the congregation’s ChurchTools system, the Check-in module, and can view all necessary calendars. Each staff member can see the groups they are responsible for and has the internal group permission to view and host group meetings.
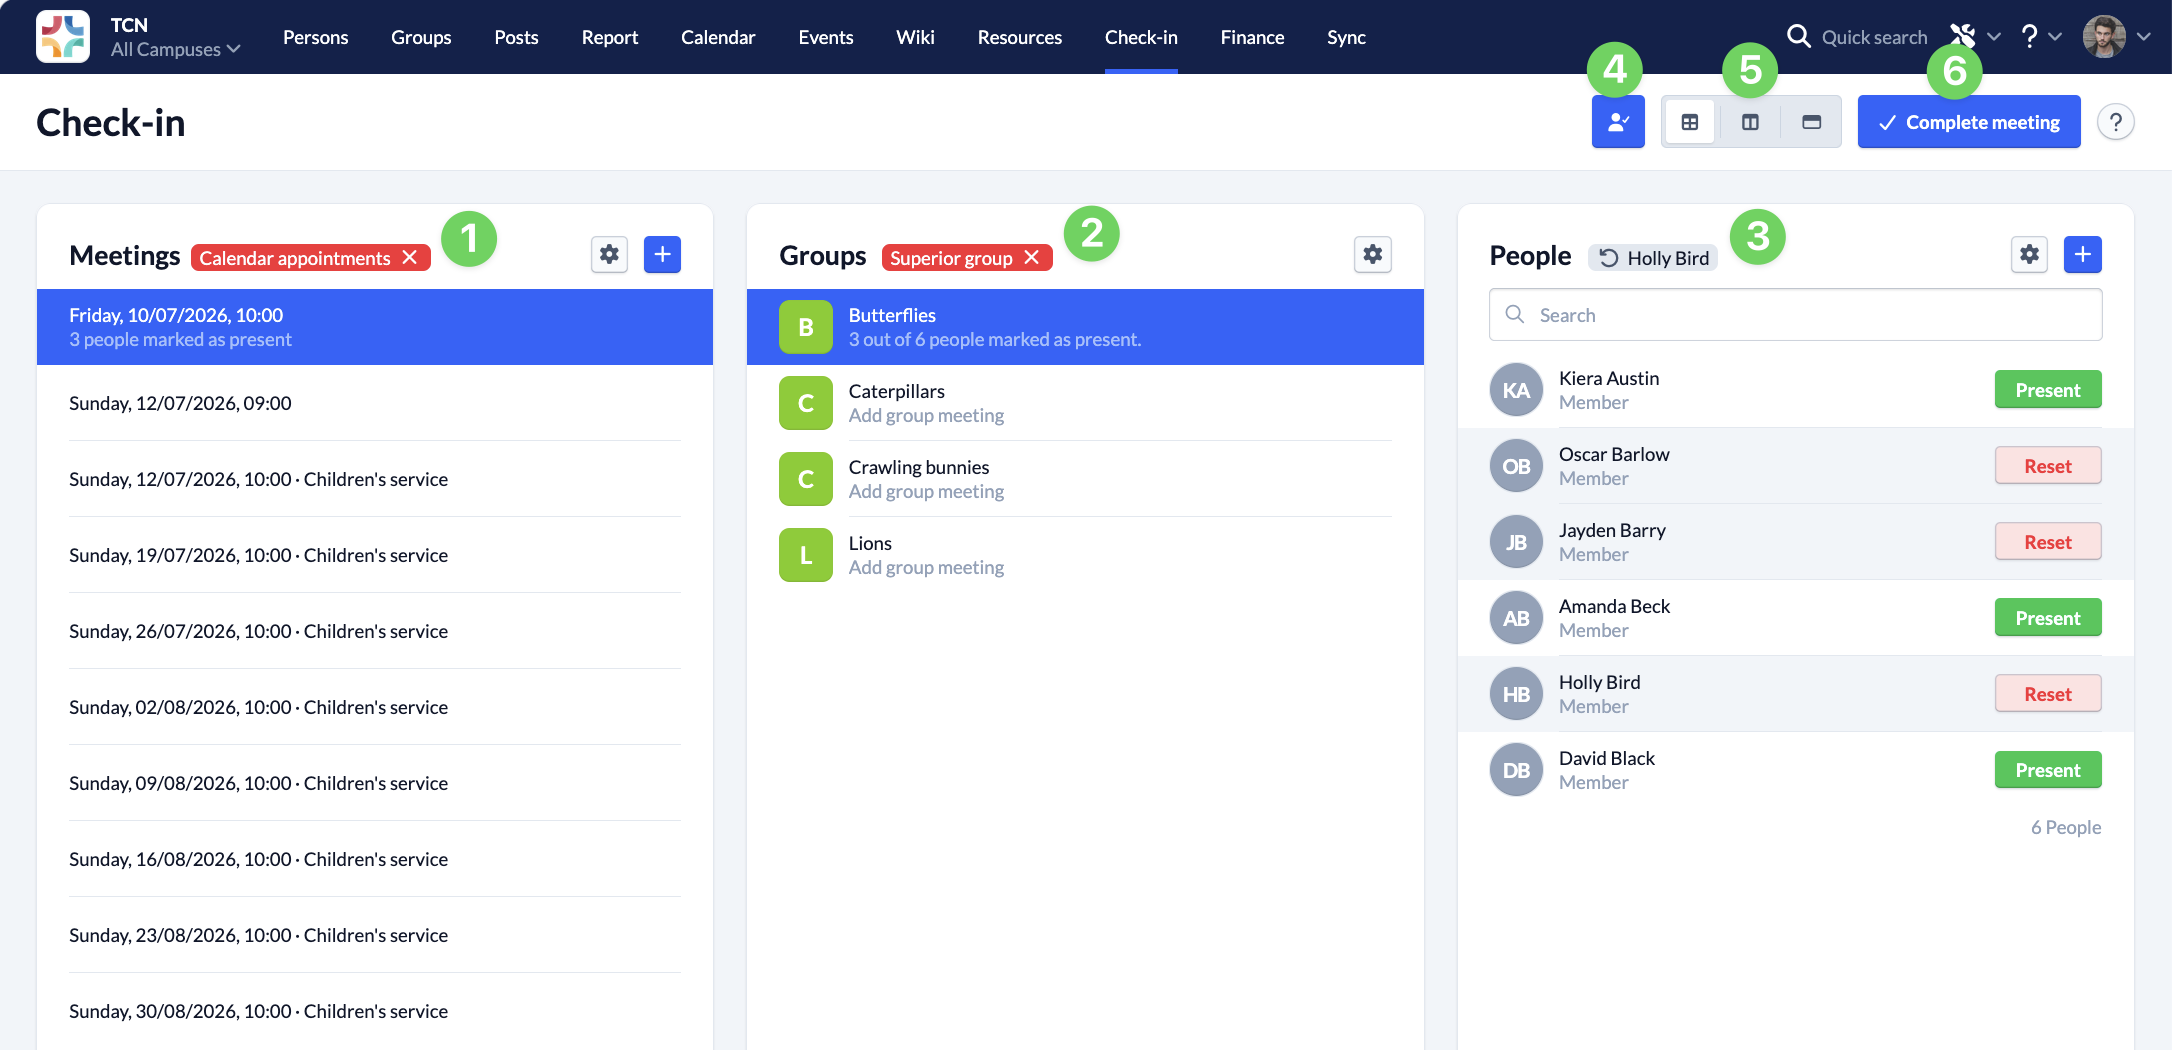
Accordingly, our check-in module looks like the one in the screenshot. We’ll explain below how to set up this view and use it to track attendance.
Preparations #
Before the event starts, every employee in our sample community should set the following filters in the Check-in module on their device. For more details about the filters in the Check-in module, see the article “How to filter events, groups, and people?”
Select a meeting (1):
Using the gear icon next to “Meetings,” we selected the calendar where the main worship service dates are managed. Now all available events for this calendar are displayed. In the list, we clicked on the worship service for our example.
Select supergroup (2):
Using the gear icon next to ” Groups,” we selected the supergroup Children’s Church . You can’t see this directly in the screenshot, but the red “Supergroup” badge indicates that the displayed groups belong to a common supergroup, which serves as a filter here.
With that, everything is set up for our example to register the children who are attending children’s church today. The children we know are now displayed in the “People” column on the right, and we can add new children there.
Customizations #
Optionally, each employee can further customize their view to suit their individual needs.
Column View (5):
In our example, it makes sense to select the simplified view in the column view options. This hides the left-hand column, ” Meetings.” We no longer need it because we have already selected today’s appointment.
In our case, we still need the middle column because we’re registering children for different children’s ministry groups. If you’ve selected only one group, you can, of course, choose to display only the right-hand “People” column.
For more information, see our article “What views are available in Check-in, and what can I use them for?”
View options for people:
Using the gear icon in the People column (3), we have specified that the children displayed should be sorted by first name, since we tend to know them by their first names.
Using the “Hide/Show Present People” toggle (4), we have set the list to continue displaying the children who have been entered.
Track Attendance #
The right-hand column now displays all the people who have been added as participants to the selected group. In our example, these are all the children who have ever been added to the “Caterpillars” children’s ministry group.
Using the green “Mark as Present ” button, we now mark every child who signs up with us as present. You can also reset their attendance status in the same place, if necessary. In the article “How to record attendance during check-in? “, we explain exactly how to do this.
Click the blue plus icon to add more children. This adds the newly entered child to the selected group, and their attendance is recorded immediately upon saving. This allows you to register new children very quickly without having to spend a lot of time on it. For more detailed information, see the article “How to create a new person using the Check-in module?”
Complete meeting #
We complete the attendance tracking for our groups by clicking ” Complete Meeting ” (6) in the upper-right corner. In the form that appears, you can provide additional information about the meeting. If a feedback template for group meetings has been saved for the selected group, that template will be displayed here for you to fill out. To learn why this is useful, read the article “Why Is It Worth Completing a Group Meeting?”
Track Attendance with the App #
In the article “How to track attendance in the App?”, you’ll find more information on how to track attendance in the app, both using a QR code and manually.