Mit dem Modul Check-in können Personen innerhalb von Gruppen zu einem Gruppentreffen eingecheckt werden. Sinnvoll ist dies z. B. bei Veranstaltungen, im Kindergottesdienst, bei Konferenzen bis hin zu einfachen Teammeetings.
If you have connected a printer, labels can be printed automatically at check-in. The number of devices at check-in is unlimited. For larger events, for example, a laptop, 8 tablets and 3 label printers can form a check-in station where three devices use a label printer at the same time.
Tutorial – Prepare check-in #
Overview of check-in #
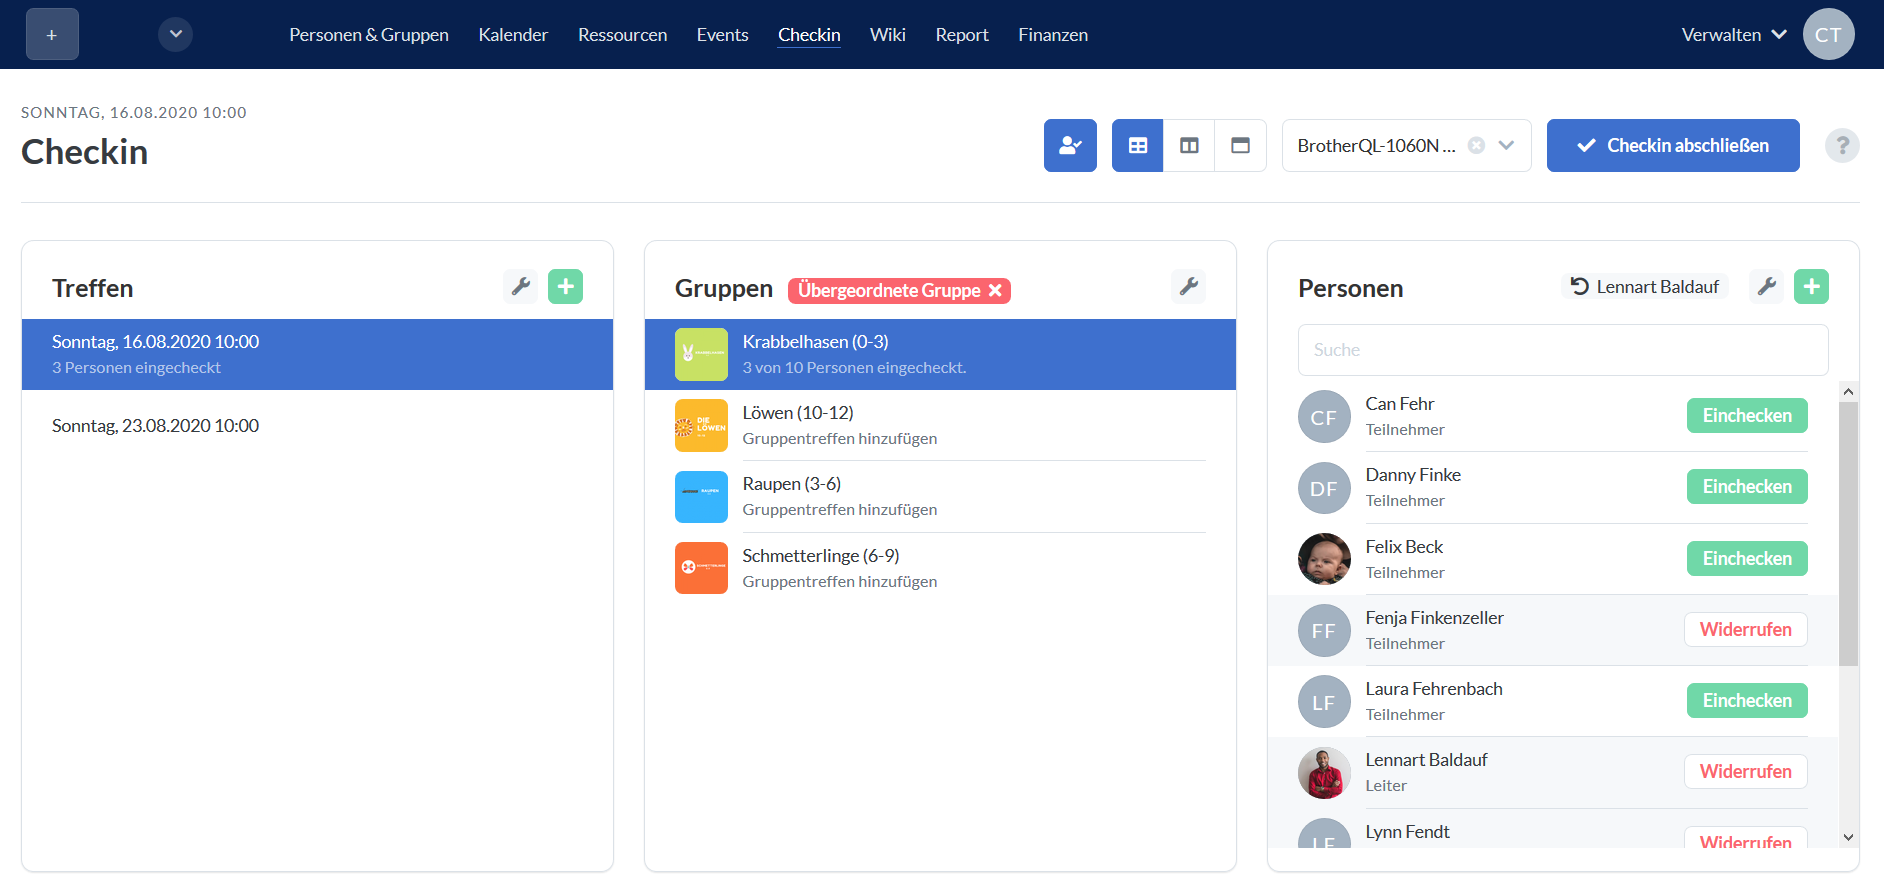
(1) Meeting #
A group can be selected by clicking on the tool icon. All available events in this group are now displayed. You can also create a new event by clicking on the green plus.
(2) Groups #
First, use the tool icon to select the superordinate group whose subgroups are to appear here. Only top-level groups in which you are allowed to see the subgroups are displayed. All Groups for which group meetings exist then appear. For Groups to appear here, they require a leader or participant who has the group-internal right “View and hold group meetings”.
(3) Persons #
All the people in the selected group are displayed here. To check in, click on “Check in” to the right of a person. You can also cancel a check-in at the same point.
Further options are available by clicking on the wrench:
- Sorting – The display can be sorted by first name or surname.
- The list of people displayed can be filtered by role.
Click on the green plus to add more people. New people created in this way are checked in directly when they are saved and added to the selected group.
Ab v.3.72 werden dir hier die individuellen Gruppenfelder angezeigt, die für die ausgewählte Gruppe definiert wurden. Beim Anlegen neuer Personen werden dir nun auch noch alle Felder angezeigt, die in den Personenfeldern als “Aufgeführt in Neu erstellen” markiert sind, so dass wirklich alle relevanten Daten direkt beim Check-in erfasst werden können.
Check-in abschließen #
Wenn der Check-in für ein Gruppentreffen beendet ist, klickst du rechts oben auf “Treffen abschließen”. Im Formular kannst du weitere Informationen zum Treffen angeben. Ist für die ausgewählte Gruppe eine Feedback-Vorlage für Gruppentreffen hinterlegt, wird dir hier diese Vorlage zum Ausfüllen angezeigt.
Check-in with the app #
Hier findest du Informationen, wie der Check-in mit Check-in-Codes und der manuelle Check-in in der App funktionieren.
Check-in for church services with participant restrictions #
Here you can find a blog article about how check-in is carried out for church services with participant restrictions
Print labels #
Beim Check-in können Namensschilder oder Abholscheine gedruckt werden. Welche Einstellungen dafür angepasst werden können, erfährst du hier.
In the Check-in module, if a printer is set up, you can select a printer in the top right-hand corner. As soon as a check-in is carried out, the corresponding labels are printed. If nothing is to be printed, no printer is selected.
Print out pick-up slip #
If, for example, smaller children are dropped off by their parents for the children’s service, a pick-up slip is an advantage in some cases:
- Only those who have dropped off the child are allowed to pick it up. Especially if there are several employees, it is easy to lose track. A stranger could otherwise pretend to be a parent.
- If a child needs to be picked up urgently by the parents, the parent can be informed via a projection, for example. The name of the child or the parents should not be displayed, as not everyone needs to know which child it is. Therefore, a code is generated that is written on the child’s label as well as on the bill that is given to the parents and that can then be displayed, for example.
How it works #
1. Tag im Personenmodul hinterlegen
Im Personenmodul wird ein Tag für das doppelte Ausdrucken von Etiketten definiert, z. B. Kindergottesdienst. Dieses Tag wird den Benutzern angehängt, für die ein doppeltes Etikett ausgedruckt werden soll, z. B. im Fall des Kindergottesdienstes den Kindern der Gottesdienstgruppen.
2nd day in the system settings for check-in
Danach hinterlegst du in den allgemeinen System-Einstellungen für das Modul Check-in, für welches Tag aus dem Personenmodul der zusätzliche Etikettenausdruck erfolgen soll.
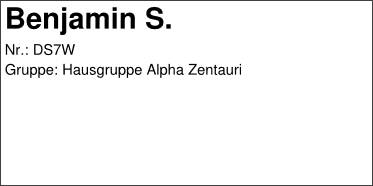
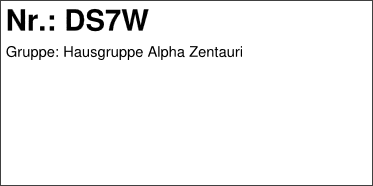
3. additional label is printed automatically at check-in
If, for example, a child is checked in for the children’s service with this tag, Check-in now automatically prints two labels. The name and the group are printed on the clothing label, as well as a randomly generated code. The pick-up label only contains the code and the group.
Permissions #
Check-in for your own group: In order for a leader to be able to use Check-in for their own group, this user always needs the global permission Check-in > “Check-in” and the group-internal Permission to view and hold group meetings.
Check-in für eine Untergruppe: Ein Nutzer ist Teil einer Obergruppe und soll den Check-in für Untergruppen durchführen, ohne selbst Teil dieser Untergruppe zu sein. Dazu müssen die oben genannten Berechtigungen in den gruppeninternen Berechtigungen der Obergruppe für die entsprechende Ebene von Untergruppen vererbt werden. Wie das geht, erfährst du hier.
Optional global rights:
Check-in > May create persons allows the user to create new users limited to the Check-in module, for example if a spontaneous church service visitor joins and there is still room.
Check-in > May manage printers allows the person to edit the printers.
Personen > view “Personen” sehen wird benötigt, um nicht angemeldete, aber bereits registrierte Nutzer hinzuzufügen.