
In this guide, we’ll show you how to link two ChurchTools systems together. One of the two systems serves as the authentication server for the other system, the client. This means that users of the server system can then log in to the client system. They do not need separate Login credentials for the client.
You can also use this page as a guide if you want to use a third-party system instead of a second instance of ChurchTools. For example, you could use your ChurchTools as an authentication server for a system like NextCloud, or integrate a different authentication server with your ChurchTools. The configuration in ChurchTools remains the same.
Unfortunately, we cannot provide instructions for the other system. Please refer to the help resources provided by the respective software.
1. Prepare the OAuth server #
First, let’s look at how to add a client to your OAuth server. In the ChurchTools system, navigate to the Login page that will serve as the server. This is the system where the users who will be able to log in to the second system are already registered. We describe how to access the Login page in the section “Logging In to and with ChurchTools.”
Click on the Add OAuth client button. A window opens in which you must give the client a name. You can freely choose the name, it only serves as a unique identifier on the server. In our example, it is called “ChuToo Client”.

ChurchTools now creates all the server information that is relevant for a connection. You can find a simplified explanation of the terms used on our help page What is OAuth? (Login to third-party systems) .
The redirect URI is of course missing, as it is provided by the client and must then be entered here.

2. Configure the OAuth client #
Now switch to your client system and open the Login page there too. Open the following input mask via the Add OAuth server button. Enter the relevant data from the server here.
In the lower section of the input form, you can use the “Create New Users ” button to specify whether users who do not yet exist on the client should be created when they log in via the server using OAuth. You must then define their person status and the department and campus to which they will be assigned.

If it is important for your connection to the authentication server, fill in the Client secret field. You can freely assign a password here. No client secret is currently required for the connection to a ChurchTools server.
Finally, copy the client identifier and click Add.
If you then click on the newly added OAuth server, you can also use the ” Registration allowed ” button to enable new user registration in the third-party system.

That completes your work on the client.
3. Finalize the OAuth server #
Add redirect URI #
To complete the connection between the two ChurchTools systems, enter the redirect URI on the server’s Login page. Use the Add redirect URI button to open the corresponding window and enter the link copied from the client here.
All the data required for the connection between the server and client has now been entered.
Assign necessary permission #
To allow users of your ChurchTools server to log in to the ChurchTools client via OAuth, they need the permission “Log in to a third-party system using a ChurchTools account” (Login to External System). You can find this permission in the Permissions Management section under Administration. For more information, see our help page “Login to and With ChurchTools.”
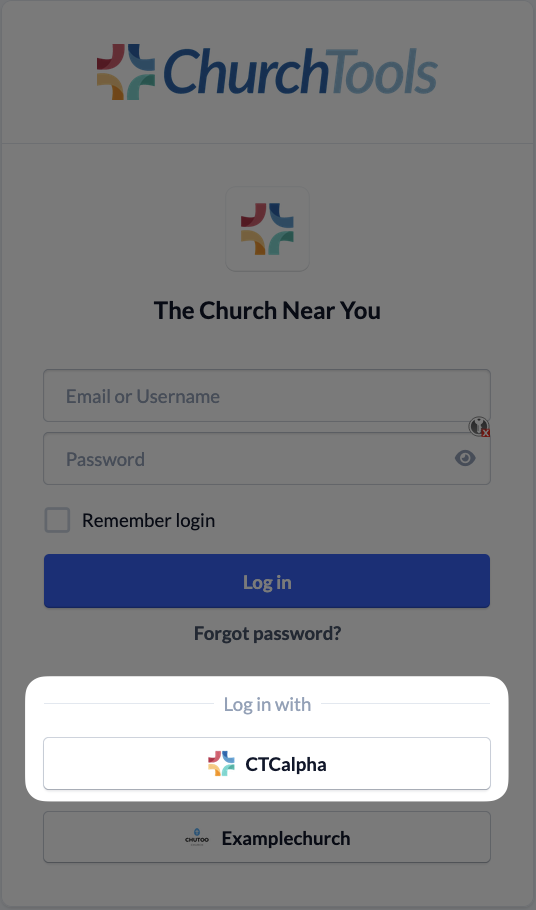
Login to the client #
The client’s Login screen now displays the option to log in via the authentication server. The default ChurchTools login may be hidden and therefore no longer visible.
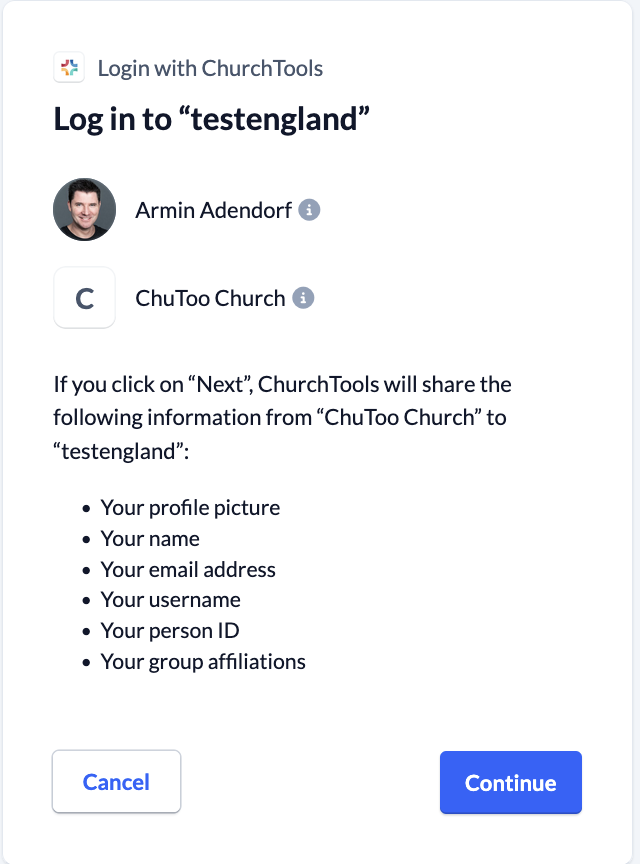
If you select this option, a window will open informing you which Login credentials are being shared from the server to the client. If you agree, you will log in on the client system. This privacy prompt appears only the first time you log in via OAuth.
Important Note Regarding Password Changes #
If you’ve only logged in to a ChurchTools system via OAuth but have never used that system’s direct Login, then you don’t have a password for that ChurchTools system.
However, you can go to your profile in this ChurchTools system and change your password there.
Here are a few things to keep in mind:
- If you don’t have a local password for this system yet, set one now.
- If you already had a local password in this system, it will now be changed.
In both cases, however, you are only changing the password for the ChurchTools system you are currently logged into. This does not change the password for the system you used to sign up for this ChurchTools system.
A brief example
You use Google to sign up for ChurchTools. There is no other option on your Login page.
You can still log in to your ChurchTools system and set or change your password there.
However, this will only change the password for your ChurchTools account. You don’t actually need this password because you can only log in through Google.
This means your Google password will remain the same and will not change.