


With SAML, users can log in to ChurchTools through your organization’s central authentication service. You can set up the connection directly in the System settings.
SAML is a standard for the secure exchange of authentication information. Your authentication service — the Identity Provider (IdP) — verifies a person’s identity. ChurchTools accepts this verification as the Service Provider (SP). This allows people to use their existing account with the authentication service instead of needing another password for ChurchTools.
What you should prepare #
- You need access to the system settings and permissions to manage users.
- Your organization needs a SAML identity provider. You or your IT administrators must be able to set up an application for ChurchTools there.
- Have the provider’s SAML metadata ready, preferably as an XML file. Alternatively, you’ll need the provider’s identifier, login URL, and public signing certificate.
- Specify which users are allowed to sign up and whether users who do not yet exist in the system should be automatically created in ChurchTools.
1. Create a SAML provider #
To make setting up the SAML connection as easy as possible for you, we’ve created a wizard to guide you through the configuration process.
- Open System settings from the Manage menu. Under General, select Login.
- In the ” Login via Third-Party System ” section of the “Login ” section, click ” + Add Login Provider ” and select SAML.
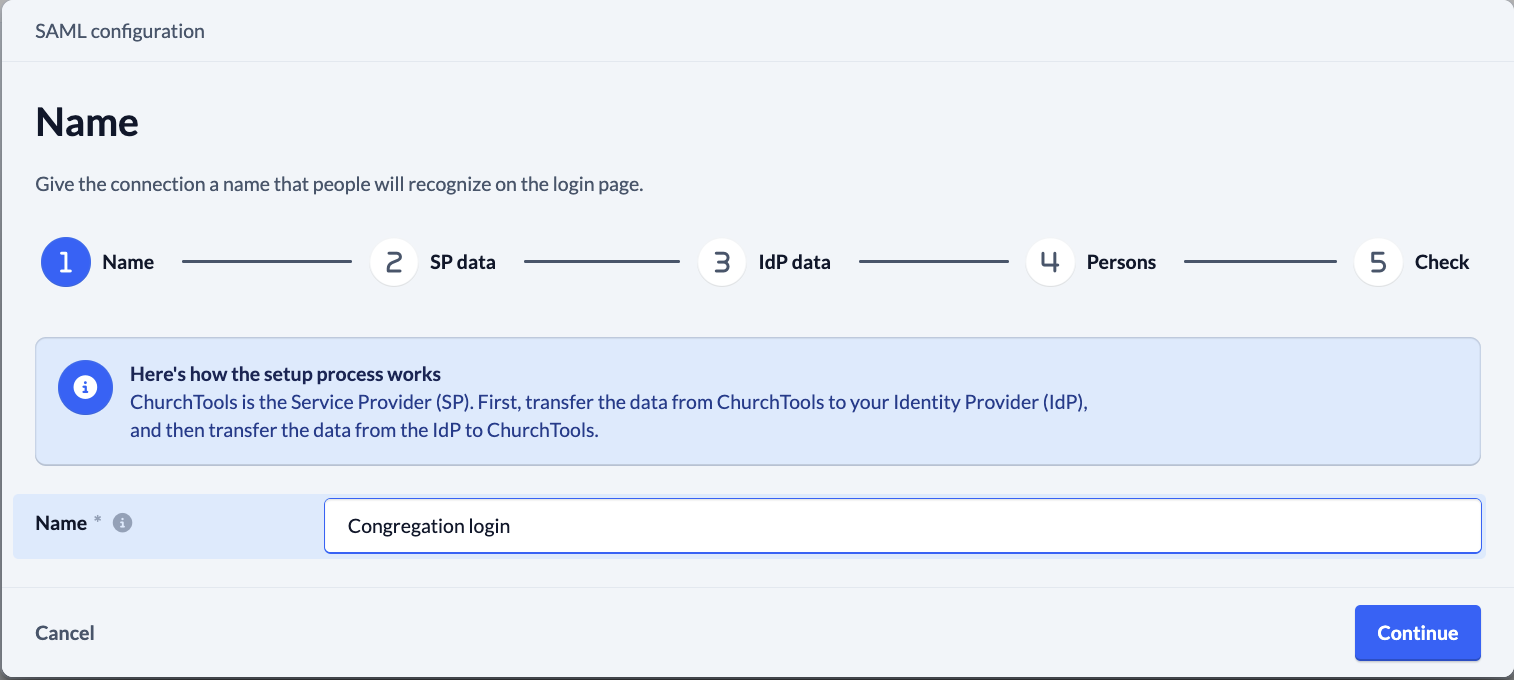
- In the “Name” step, enter a descriptive name, such as “Congregation Login.”
- Click Next. ChurchTools will first create a draft. This is not yet available as a login option for users.
2. Set up ChurchTools with your identity provider #
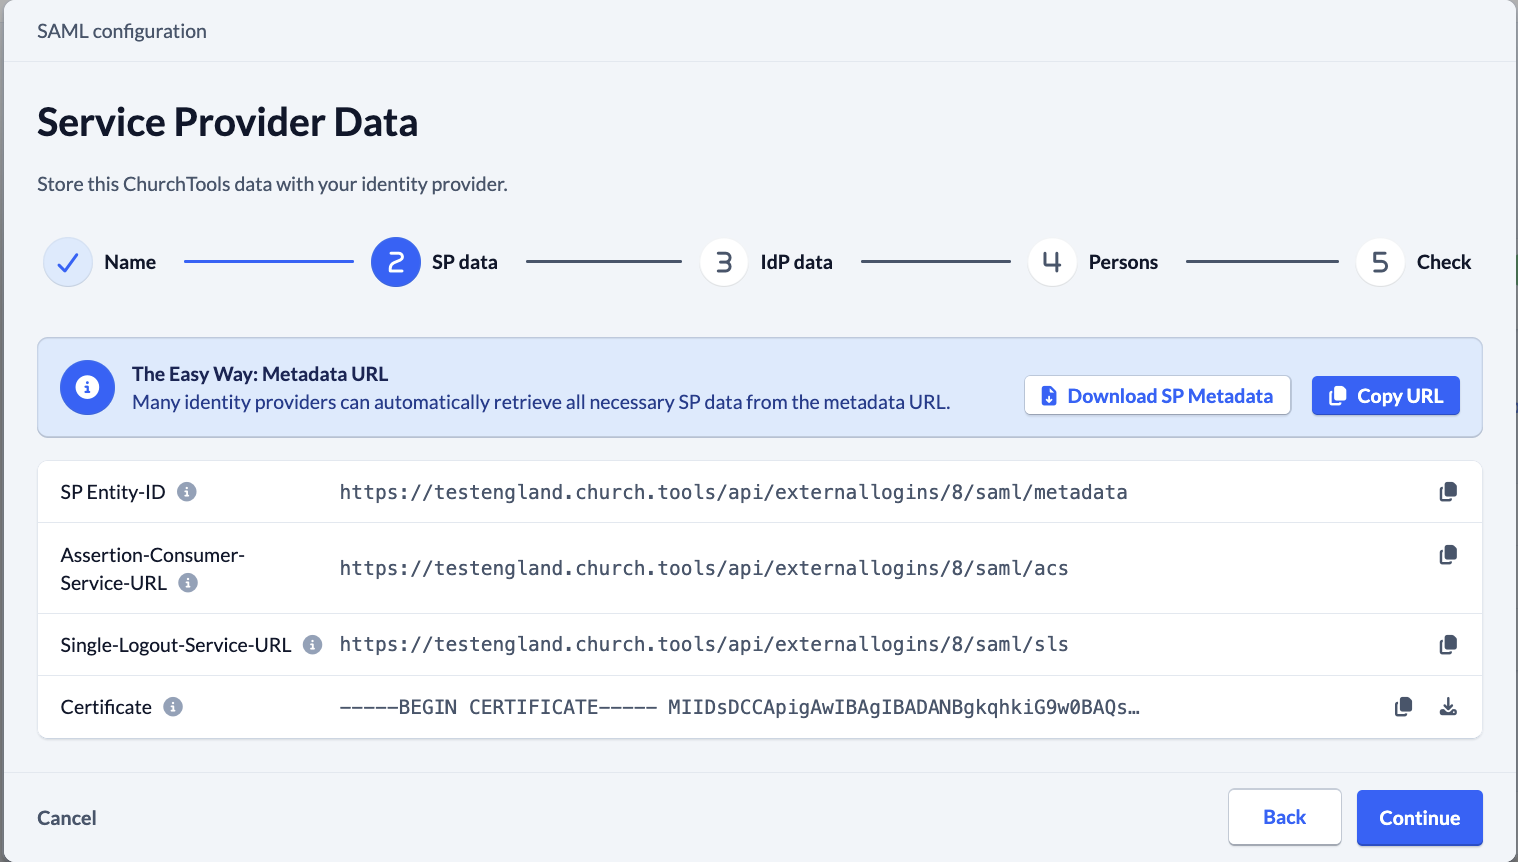
In the “Service Provider Data” step, ChurchTools displays the information your provider needs to establish the connection. Go to your identity provider’s administration portal and create a SAML application for ChurchTools there. The terminology and steps for setting this up vary depending on your identity provider. Refer to your provider’s SAML documentation or consult your IT staff.
- In ChurchTools, click ” Copy URL ” and enter the metadata URL with the provider if it supports importing via a URL. Alternatively, you can download SP metadata and import the file there.
If you need to enter the values individually, copy the SP Entity ID and the Assertion Consumer Service URL. The latter is the response address to which the provider sends the login confirmation. The Single Logout Service URL is intended for joint deregistration. If your provider requires an SP certificate, you can copy or download it from the “Certificate” line. - Grant the designated users access to the application through the provider.
- Return to ChurchTools and click Next.
3. Import data from the identity provider #
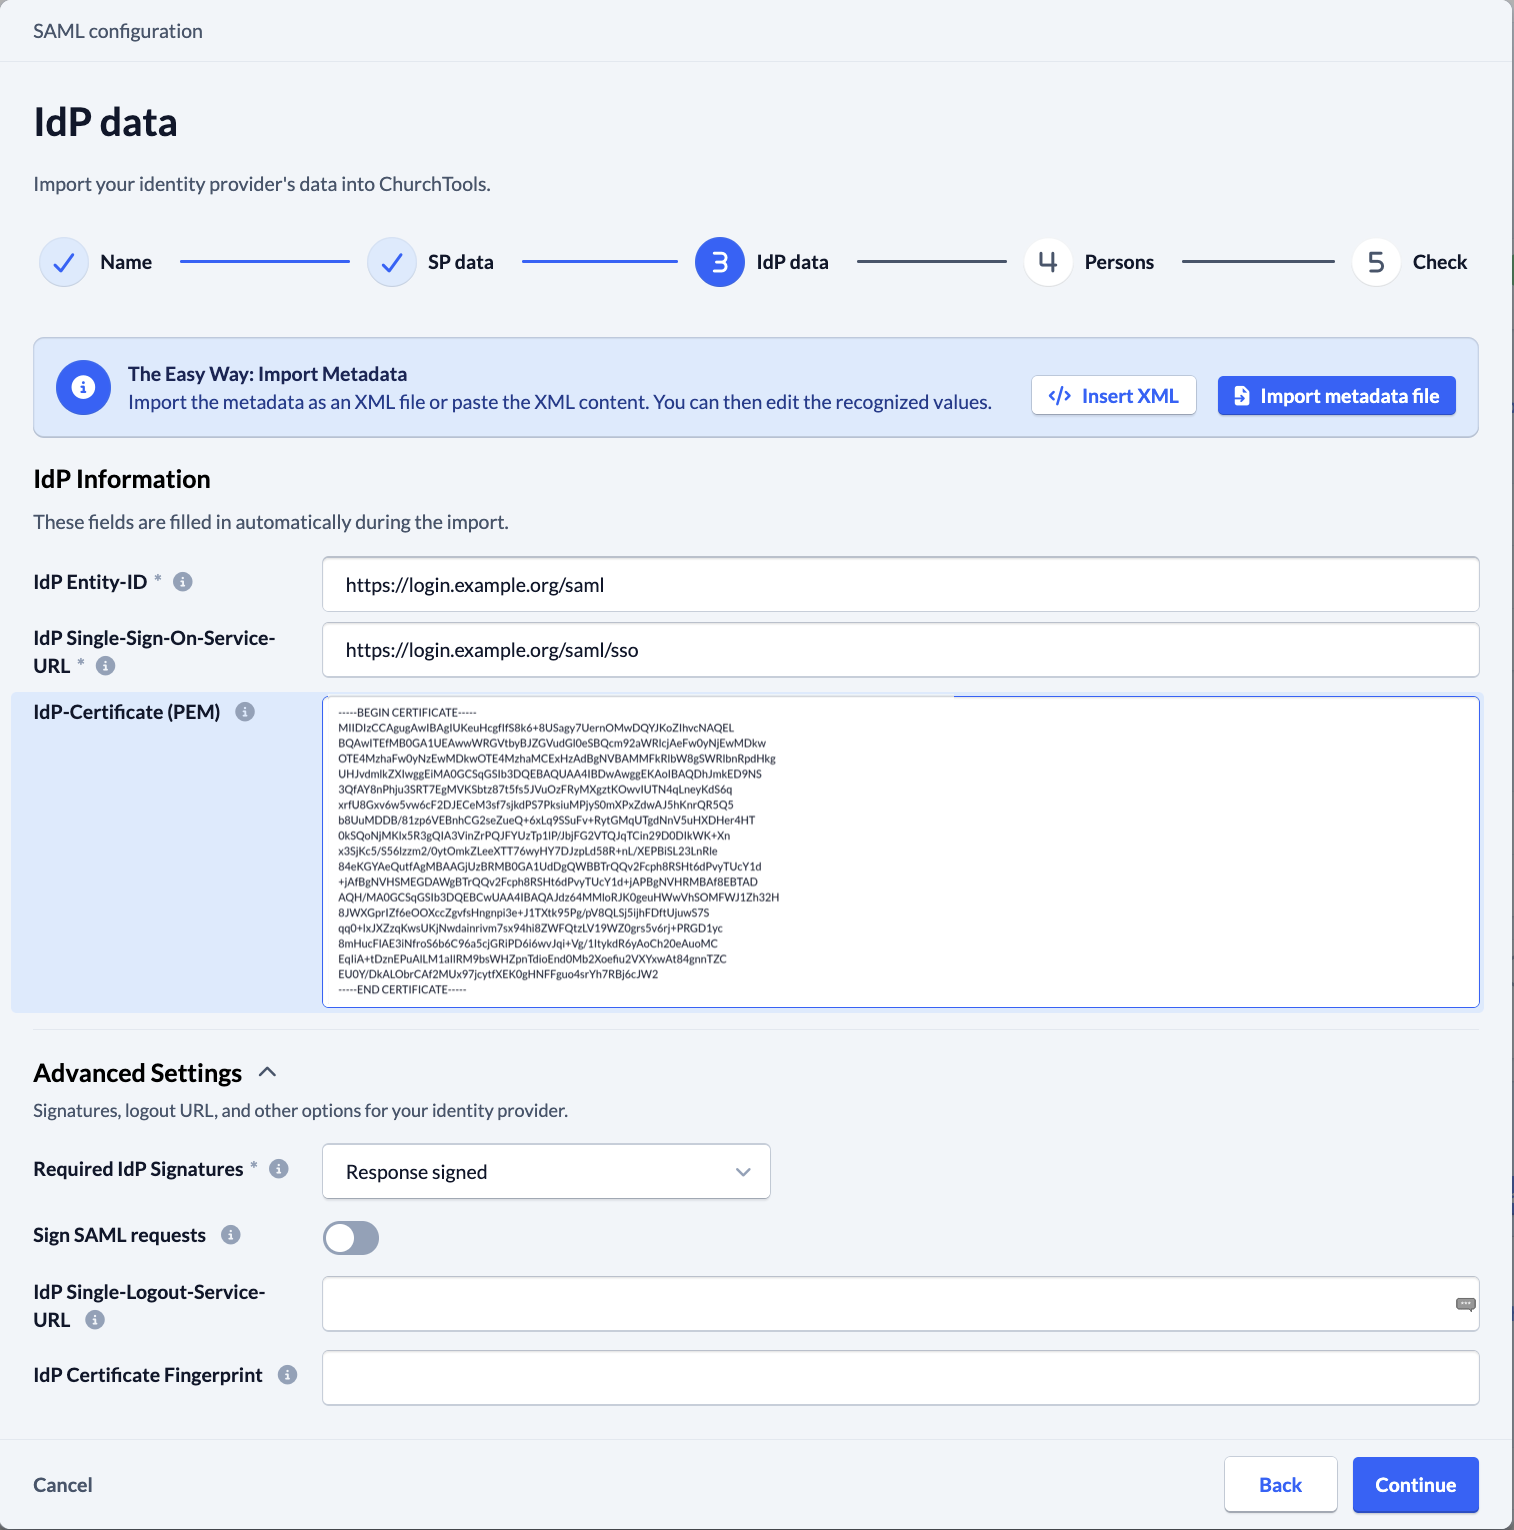
- In the IdP Data step, select the Import Metadata File button and upload your provider’s XML file. You can also paste the XML content directly using the Paste XML option. Check the imported information.
If you do not import the data, you’ll need to enter it manually: The IdP Entity ID is the provider’s unique identifier, the IdP Single Sign-On Service URL is its registration URL, and the IdP Certificate (PEM) is its public signature certificate. The certificate helps ChurchTools verify the authenticity of the login confirmation. - If necessary, open Advanced Settings and coordinate the security options with the provider.
- Then click Next.
What do the advanced settings mean?
- Required IdP Signatures: Depending on your provider’s configuration, select “Response Signed,” “Assertion Signed,” or “Response and Assertion Signed.” “Response” refers to the response message, and “Assertion” refers to the identity confirmation contained within it. The default setting is “Response Signed.”
- Sign SAML requests: Enable this if the provider expects signed requests from ChurchTools. The “Signature Algorithm” field will then appear. Coordinate the algorithm with the provider and, if necessary, enter the ChurchTools certificate from the SP data in that field. This option is initially disabled.
- IdP Single Logout Service URL: Optional provider deregistration URL for a shared deregistration.
- IdP Certificate Fingerprint: A fingerprint used to identify the certificate. Use this alternative to the full certificate only after consulting with your IT administrators.
4. Identify people and recreate them if necessary #
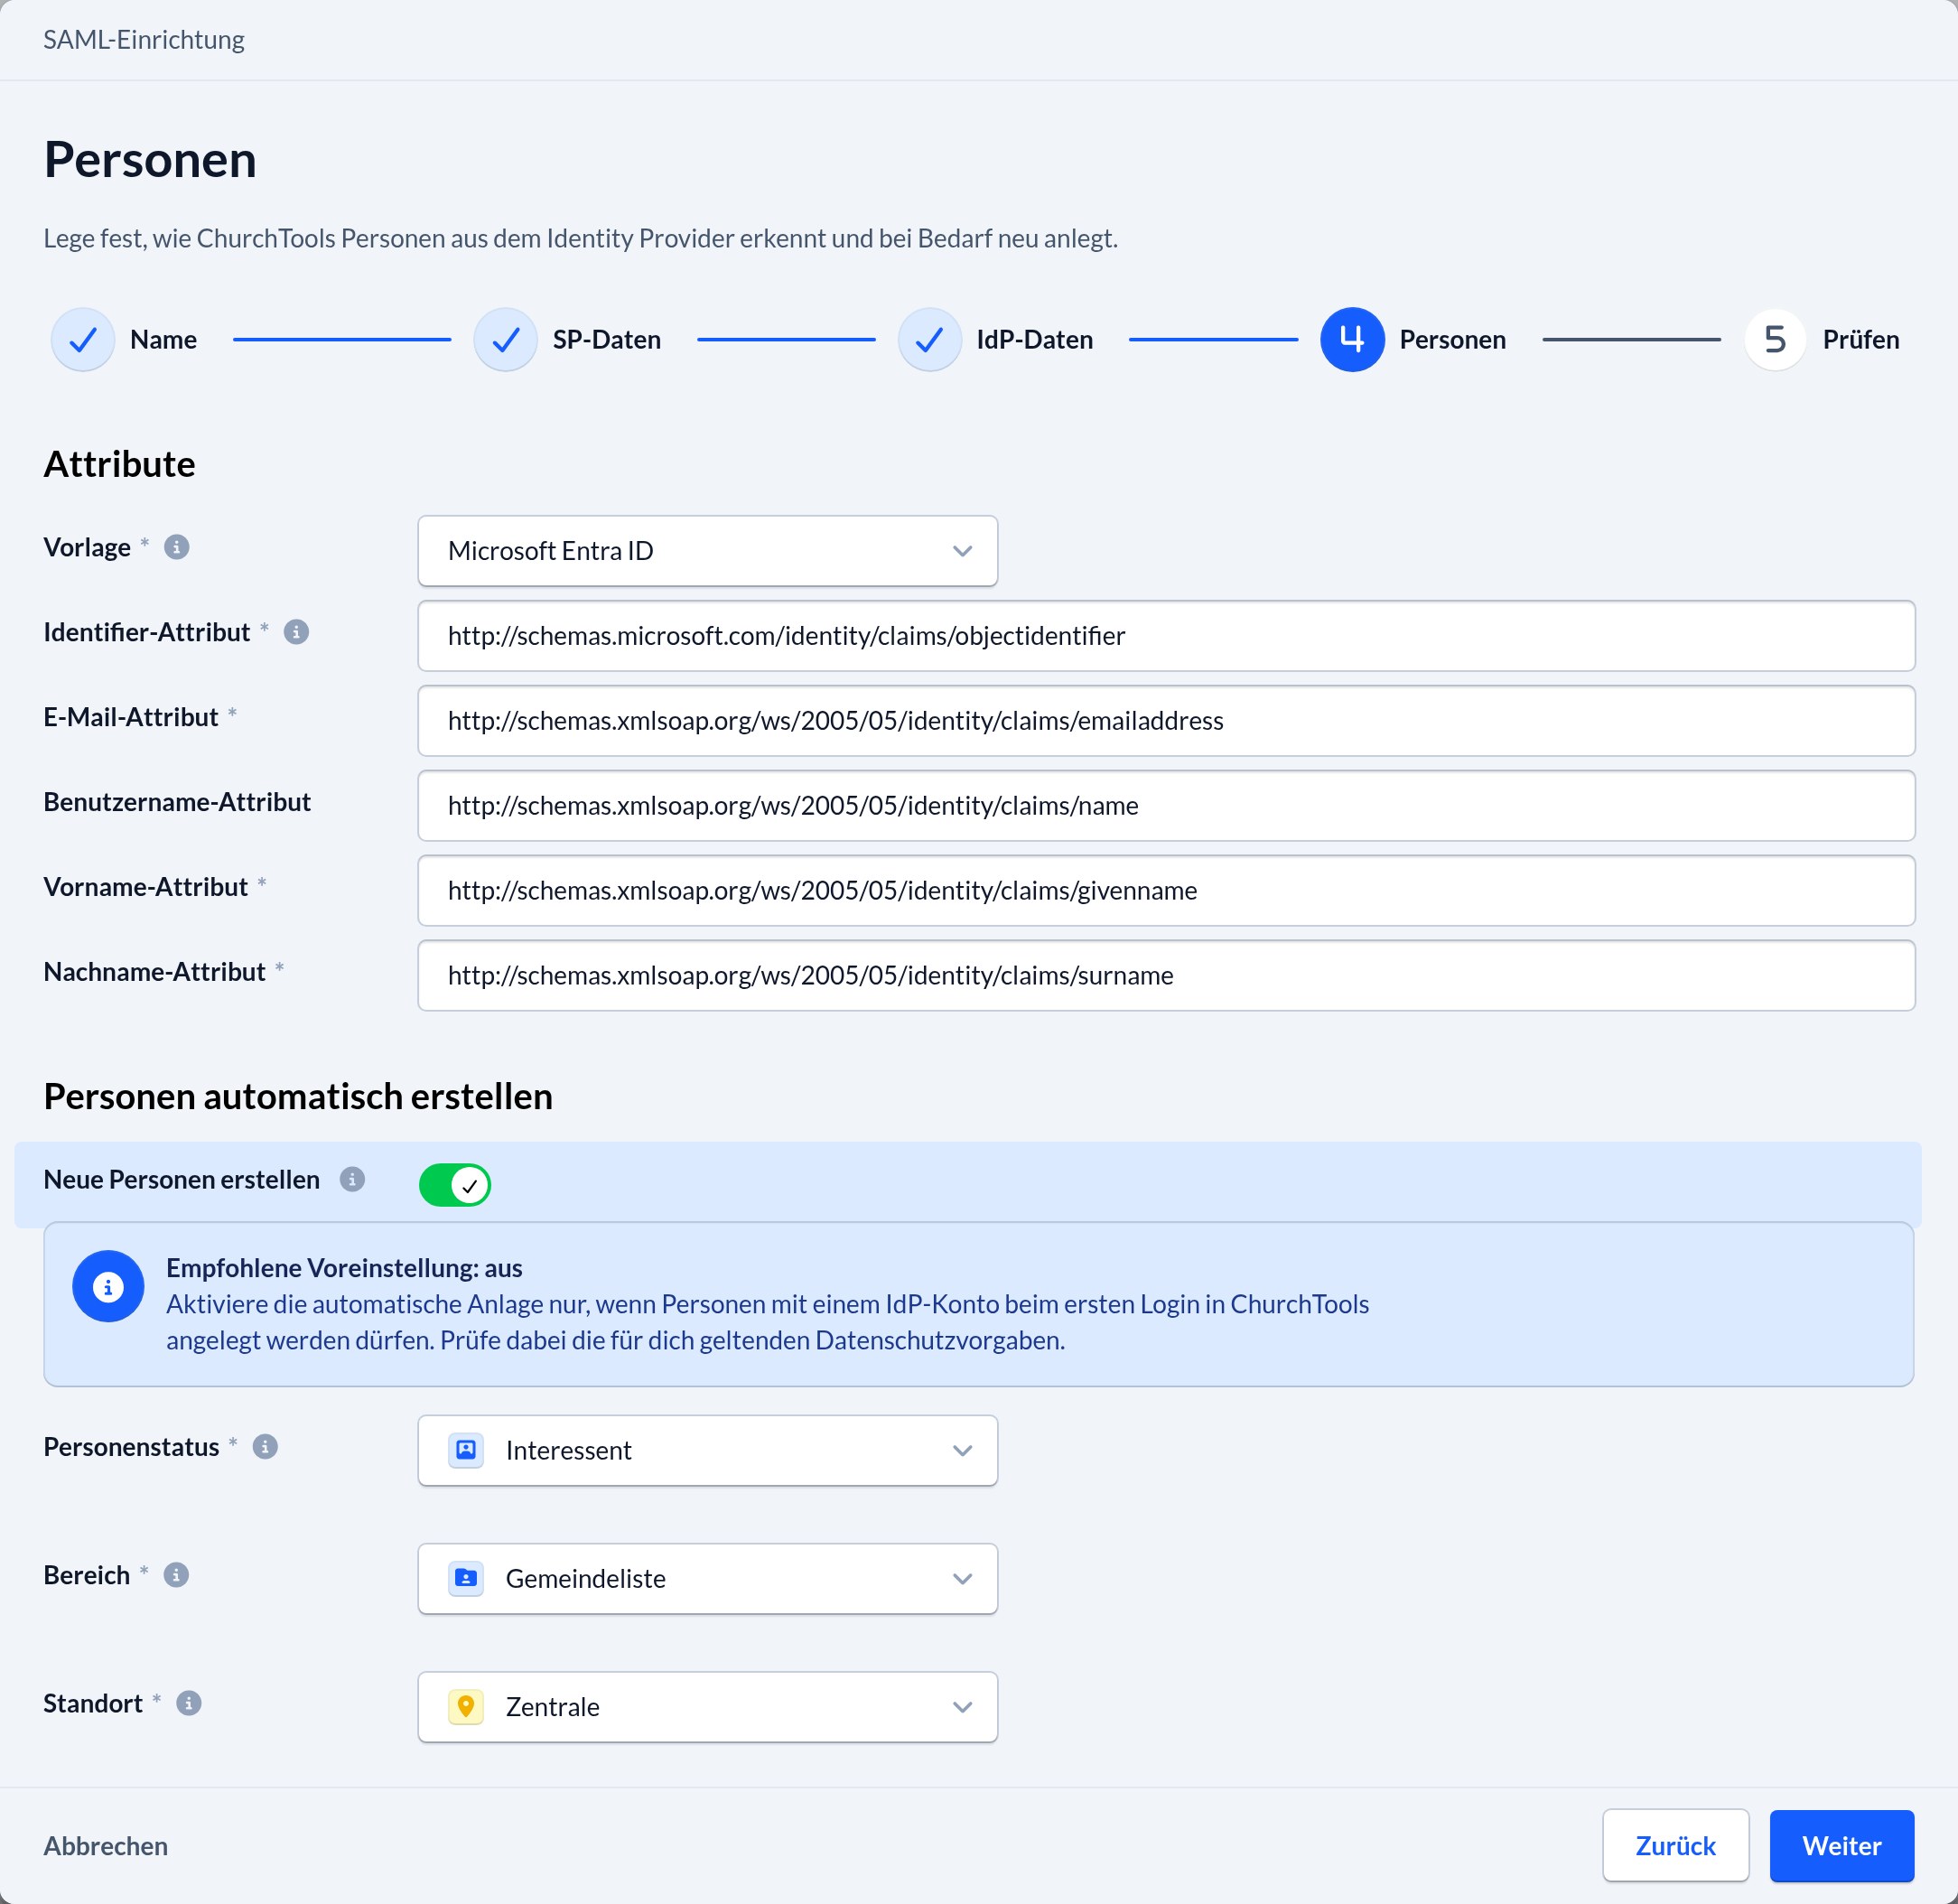
In the “People” step, you specify which information ChurchTools uses from the registration confirmation. The fields contain the provider’s attribute names, not the personal data of an individual user.
- Under “Template,” select the template that matches your provider. For new providers, Microsoft Entra ID is preselected. Even when using a template, make sure the mapping matches your provider’s configuration.
- Check the “Identifier” attribute, “e-mail” attribute, “First Name” attribute, and “Last Name” attribute. This information is required. The identifier attribute must provide a permanently stable and unique user ID. The username attribute is optional; if no username is provided, ChurchTools uses the e-mail address.
- Leave ” Create New People ” turned off if only existing people are to have access. If new people are allowed to be created automatically, turn on the option and select the person status, department, and campus for these people. Click Next.
How does ChurchTools find the right person? #
A previously saved association between the provider account and a ChurchTools person is used first. If there is no such association when a user performs a first Login, ChurchTools compares the first name, last name, and e-mail address with those of existing, non-archived contacts. An additional e-mail address associated with the contact may also match.
- Exactly one matching person: ChurchTools links the provider account to this person.
- No matching person: If “Create New People” is enabled, a person is created based on the selected criteria. Otherwise, registration is not possible.
- Multiple matching people: The registration is canceled. Administrators are notified by e-mail so they can review the ambiguous personal data.
5. Test the connection and enable SAML #
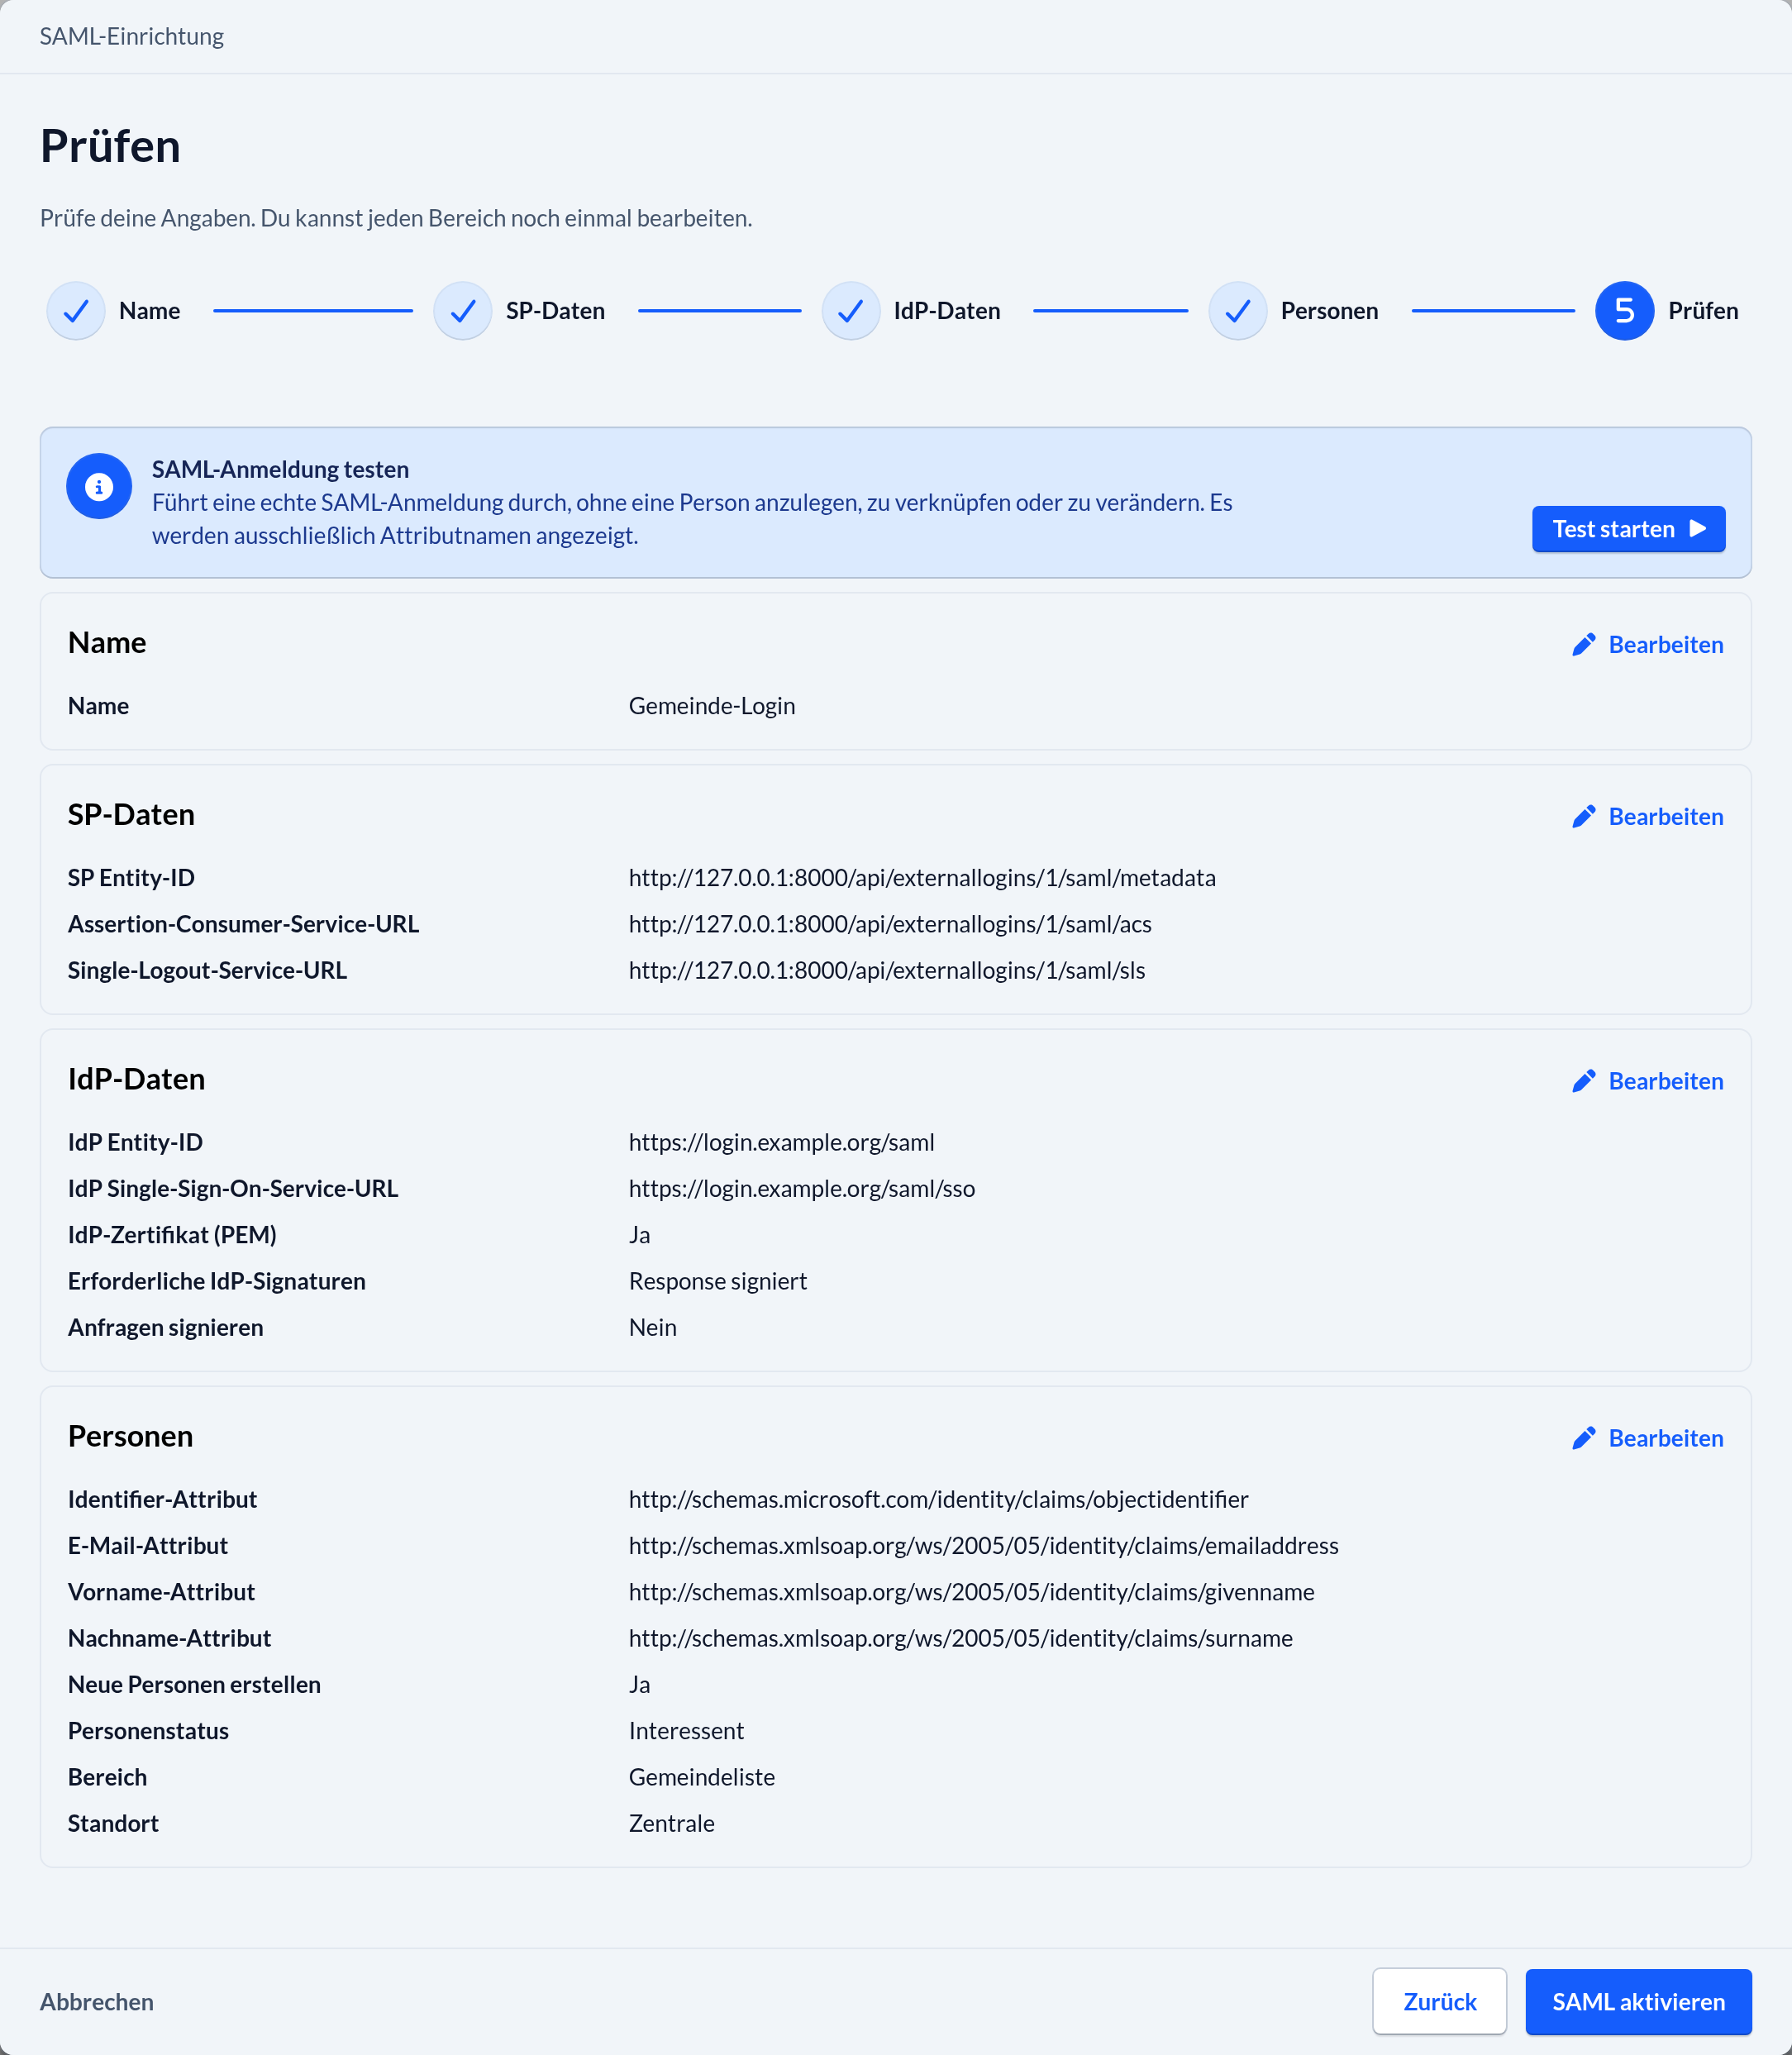
- In the “Review ” step, review the summarized information. You can use the steps at the top to return to a previous section.
- Click ” Start Test ” and sign up for the identity provider in the new window that opens. Allow pop-ups for ChurchTools if your browser blocks the window.
- Check the result and make sure the required attributes are present. If any required information is missing, correct the assignment under ” People ” or the information submitted to the provider, and repeat the test.
- Click ” Enable SAML” when the setup is complete. Then, have a designated person test a regular registration.
To make changes later, open the SAML provider on the Login page. There you’ll find its endpoints, provider data, information about imported certificates, and the option to test the SAML registration again. Using the three-dot menu, you can re-import metadata or edit the configuration manually.
You manage your password for the sign-in service there. Changing your password in ChurchTools does not change the password with the identity provider.