
We have documented the entire ChurchTools rights management for you so that you can look up which permissions are required for which functions at any time. We keep this reference constantly up to date and make it available to you directly in ChurchTools.
You can find this documentation either in our Academy or directly in your own ChurchTools.
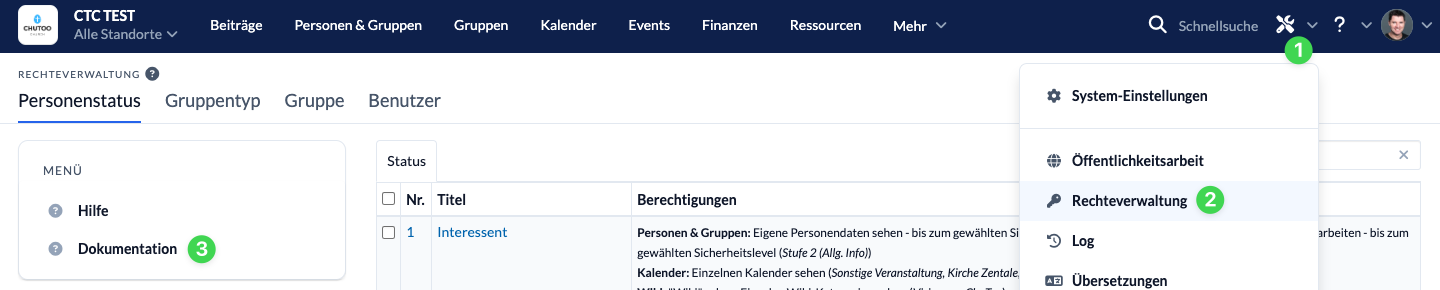
To do this, open the rights management (2) and call up the documentation (3) via the menu on the left-hand side.
In this article, we will first give you some basic information that you should know about the documentation in advance. In the application examples section, we explain specifically how to read the documentation so that you can get the maximum benefit from it.
Basic preliminary information #
- The headings are always exactly the functions that you can find in ChurchTools. If you want to know which rights a user needs to enter absences, for example, scroll to “Enter absences”.
- The functions are listed by module. You can use the buttons in the filter bar to quickly search for all functions of an individual module. To find specific functions, we recommend you search using CTRL + F or Cmd + F.
- Under the heading you will find a diagram that shows you one or more ways in which you can authorize a user for the selected function. Each path always starts at the top. If you follow the diagram elements to the end, the user can use the selected function in any case. As you move through the elements, you will see the necessary permissions that you need to assign.
- There are elements in the diagram that are framed in orange or yellow.
Yellow elements are shown one below the other and always represent an “and” link.
Orange elements, on the other hand, are shown next to each other and always represent an “or” link.
Application examples #
1. “And” – read links correctly #
The prerequisites for a user to be able to see absences in events are the following in pure “and” links:

You can see from the yellow color and the fact that they are shown one below the other that the individual elements work together in an “and” link.
So you have a path with two related prerequisites that you enter at the top:
If you come out at the bottom and both requirements are met for a user, they can see absences in events.
2. “Or” – read links correctly #
The prerequisites for a user to be able to edit a group picture are listed here in pure “or” links:

You can see from the orange color and the fact that they are shown next to each other that the individual elements in an “or” link work independently.
In this case, you have four paths that you can use independently of each other, each of which can be accessed at the top. All paths lead to the user being able to edit the group information of the group:
If you come out at the bottom and all the requirements of your path are met, the user can edit a group picture.
3. correctly read the connection between “and” and “or” links #
The requirements for a user to be able to send an email to certain recipients are listed here in “or” links next to each other, whereby one of the “or” links requires an “and” link:
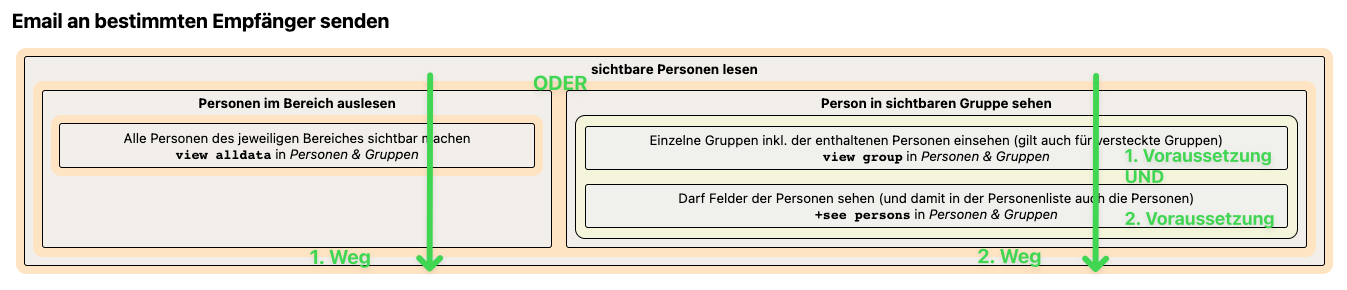
You can tell from the orange color and the fact that they are displayed next to each other that the individual elements in an “or” link work independently. Both paths allow the user to send emails to specific recipients. In the orange element on the right, you can see two yellow elements below each other that work together in an “and” link.
You therefore have two paths that you can use independently of each other. However, one of the two paths is made up of two connected prerequisites. You enter both paths at the top.
If you come out at the bottom and all the requirements of your path are met, the user can send emails to certain recipients.